Getting My Shit Together: Dotfiles, Brewfile, 1Password SSH-Agent
Tags: #dotfiles, #homebrew, #1password, #ssh, #macos

I've been a Mac user for about 20 years now. In that time I've heard a lot of people talking about dotfiles, and I understood that a file prefixed with a dot made it (by default) invisible in Finder. But I never really took the time to learn how dotfiles as a concept worked, and what benefits it could offer. So, as succinctly as I can make it, here's the guide I wish I had so many years ago.
What are dotfiles, and why would you share them?
.gitconfig, .npmrc, etc: these are configuration files. They contain your personal settings for a lot of the apps that you use. It's beneficial to share them (even just privately with yourself) to make transitioning to a new computer easier. Makes it easier to copy your settings to the new machine without copying all of the clutter that you built up over the years too.
It's also quite helpful to store them all in source control so that you can see what changed when you twiddled some knobs in your apps, and you can save/revert/etc as easily as git allows. If you have a really clean personal approach to security, you can even publish your dotfiles git repo publicly so others can benefit from seeing what you track and how you manage it.
Begrudgingly, I am the CISO for my company, so I know a fair amount about keeping secrets (api keys/etc) safe and out of version control... But also: the cobbler's children have no shoes. On a recent car trip when I wasn't driving I decided to ask Claude to teach me how to "do" dotfiles, and then I just kept digging. Now I'm using 1Password's "op" CLI to manage my personal secrets in the same way that we do at work, and I've got my personal SSH keys being managed by 1Password now too.
Bare git repo: the secret sauce
I used to think people relied on manually creating symlinks from where the app expects a dotfile to be to a dotfiles folder they had cloned -- and I think some people still do that. But part of what makes this approach so clean/simple/awesome is git's bare-repo feature. Start by initializing a new git repo without a working directory, and set config in that repo to not show untracked files:
git init --bare $HOME/.dotfiles
git --git-dir=$HOME/.dotfiles/ config status.showUntrackedFiles no
Instead of creating a .git folder somewhere, we've made ~/.dotfiles/ the git folder itself. There is no ~/.dotfiles/.git folder, the stuff you'd expect to find there is found right in ~/.dotfiles/ instead.
Then you can add files to that git repo from anywhere and they'll be tracked by git as usual, but that config setting we added means git won't prompt you to add any files, ever. You choose what to add. So now to view the status of our dotfiles repo, we run:
git --git-dir=$HOME/.dotfiles/ --work-tree=$HOME statusThat's going to be a pain to type those extra args every time you want to do anything dotfiles related, so I added this alias to my ~/.zshrc file:
alias dotfiles='git --git-dir=$HOME/.dotfiles/ --work-tree=$HOME'And now viewing status is as easy as:
dotfiles statusTo add my ~/.gitconfig file to the repo, I run:
dotfiles add ~/.gitconfig
dotfiles commit -m "add .gitconfig"
You treat your new dotfiles alias as if it were the git command. Add a remote and push:
dotfiles remote add origin git@github.com:atuttle/dotfiles.git
dotfiles push -u origin main
Yep, you can browse my dotfiles repo here.
In there you'll find my .bin folder (~/.bin/), which my included ~/.zshrc file shows is also on my $PATH. That .bin folder contains a bunch of tiny utility scripts that I created because my memory isn't great. It's a lot easier to remember "I have a command for that" than it is to remember that this is how you weigh all of the node_modules folders in a monorepo (node_weight in my .bin folder).
⚠️ Important: Don't commit secrets, especially if you're going to post your dotfiles publicly!
Brewfile
Brewfile! I've been using Homebrew for what seems like forever, but never bothered to learn the fundamentals. I just knew that since I have it installed I can use brew install whatever to install stuff, and it just worked.
While Claude was teaching me about dotfiles it suggested that I also export my Brewfile and include that in my dotfiles repo. I was shocked to learn such a thing was even possible.
brew bundle dump --file=~/.config/.Brewfile
dotfiles add ~/.config/.Brewfile
dotfiles commit -m "add brewfile"
You might want to audit what's in that brewfile before (or after, thanks git!) committing it. After all, who among us hasn't installed something on homebrew, decided we weren't going to use it (or just kinda forgot and stopped using it), and forgot to uninstall it?
At the very least, audit anything in there you don't recognize with brew info <package> and if you don't need it, remove it from the brewfile to avoid installing it on your next computer.
About those secrets...
op CLI
At this point you might be wondering what to do about config files that you want to track but which contain secrets. While going through this process I audited my dotfiles (that is, files that start with a dot in my home directory and in ~/.config/) and found that almost all of them could simply be removed. Being on the same laptop for a long time has meant that apps have matured and where they previously stored an oauth token in a dotfile, they might now support reading it from an environment variable. In most cases, I was able to remove the offending lines. If it wasn't possible I asked myself how badly I needed that file in the repo anyway. Is it really that much trouble to log back in to the app after it's installed?
This next part is where it starts to feel just a tad rube-goldberg-ian, but once you understand how it all fits together it makes sense and not only makes it safe to share your dotfiles but also just makes your computer safer because you don't have as many important secrets just hanging out in plain text files.
1Password is my password manager of choice[1]. I was a happy paying customer for years before I recommended that my company use it for managing our secrets. We do, it's been an amazing tool for doing that. And as an added bonus, every person who has an employee-seat in your business license gets a free family account too (up to 5 people per family account).
1Password has dozens of great features that I glazed them for on episode 245 of the Working Code podcast, but the one that's really useful here is their op CLI tool. Think of it as a way to make certain secrets of your choosing available as environment variables only for the duration of a single command execution.
Let's get concrete.
I don't have an example of where this is necessary for a personal need right now but I'll translate from work experience.[2]
We use GitHub Packages private npm registry. NPM no longer supports long-lived tokens, but GitHub does. We store the token in 1Password, and in .npmrc files we can reference it via an environment variable.
@atuttle:registry=https://npm.pkg.github.com
//npm.pkg.github.com/:_authToken=${IQ_NPM_TOKEN}- Create a new 1Password item for the token.
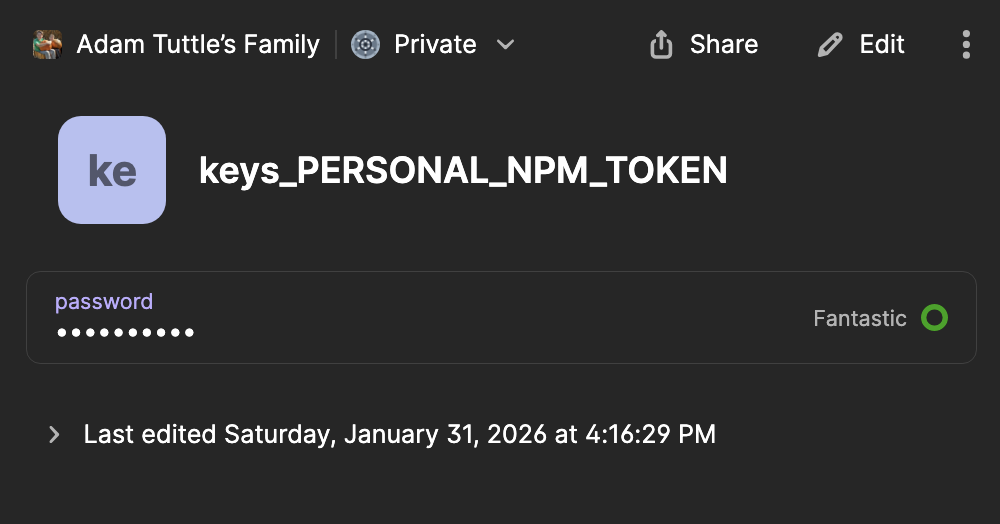
Note that the title of the entry is keys_PERSONAL_NPM_TOKEN, the name of the field containing the token is password, and the entry is saved in the vault named Private (very top of the image). These will become important momentarily.
So how do we tell 1Password that we want this secret available as an environment variable? With a custom ENV file that uses a special op syntax to describe where to find it.
- Create a file that defines the ENV variables you want to expose and how to find them in 1Password.
In my dotfiles you'll also see a .config/op/personal.env:
NPM_TOKEN=op://Private/keys_PERSONAL_NPM_TOKEN/passwordThe syntax is: op://<vault name>/<item name>/<field name>.
- Putting it together: Create a new script that runs the
opcommand with some args to specify your ENV file. I put mine in my.zshrcfile, but you could put it in your~/.bin/folder too.
opat() {
	op run --env-file="$HOME/.config/op/personal.env" -- "$@"
}
I called mine opat because at work we've been using a similar wrapper named opiq, so I wanted something similar and since my name is Adam Tuttle and it's easy to type "opat", that's what I went with.
The above works if you're only a Personal account holder, but since I'm already using 1Password for work I needed to make a small tweak to specify which account it should check. my.1password.com is the domain for personal accounts.
opat() {
	op run --account my.1password.com --env-file="$HOME/.config/op/personal.env" -- "$@"
}
Now, when I need to install a dependency from my private npm registry: opat npm install @atuttle/private-package. opat pulls in my NPM_TOKEN from 1Password for the duration of the command, the npm command is none the wiser, and I'm happy that things are more secure.
1Password SSH-Agent
Another great feature of 1Password is their SSH-Agent. This is a daemon that runs in the background and manages your SSH keys for you. It's more secure than plaintext key files in ~/.ssh/. And even better (if you have a device that supports it) you can use your fingerprint to authenticate use of your keys.
- Enable in 1Password: Settings > Developer > Turn on "Use the SSH Agent". If you have it, I also recommend enabling "Authorize using Touch ID" for biometric auth.
- Add to
.zshrc:
export SSH_AUTH_SOCK="$HOME/Library/Group Containers/2BUA8C4S2C.com.1password/t/agent.sock"Don't worry about the 2BUA8C4S2C - That's AgileBits' unique identifier, so it'll be the same for you too.
- Add to
~/.ssh/config:
Host *
    IdentityAgent "~/Library/Group Containers/2BUA8C4S2C.com.1password/t/agent.sock"
Now, when things request an SSH key, 1Password will be used, and you'll be prompted to authenticate with your fingerprint.
Some parts of the future are pretty great!